2 Alignment and count
cd $WRKDIR
cd DONOTREMOVE/day7/

### How much data we have generated till now
du -h RNAseq_exercise

# Why rawRead is taking so much disk space
ls -lh RNAseq_exercise/rawReads/
## May be we can delete some unnecessary files

cd RNAseq_exercise
2.1 Step 4. Alignment of reads
Once the raw read quality has been assessed and determined to be sufficient, or the data has been filtered and trimmed to acceptable standards, the reads can be aligned to a reference. This process is an extremely active field of research and novel aligners are frequently published. There is, sadly, no “silver bullet” and the choice of aligners will be dependent on the reference to be used (genome or transcriptome), the data type (short vs. longer reads) and the available computational power, among other factors. Most recent aligners use either BWT (Burrows M 1994) (Burrows-Wheeler transformation) or MEM (Khan et al. 2009) (Maximum Exact Matches) to perform alignment. Older generation alignment algorithms relied on a spliced-seed approach (Heng Li and Homer 2010). The numerous implementations of these different strategies all come with a myriad of options that may significantly affect the alignment outcome. Selecting the most accurate aligner and determining the optimal parameter set for a project can often represent a small project in itself. At the time of writing this guide there was no guideline available as to which aligner is most appropriate for a given situation (read length, type of reference, etc.). Hence, in the following, we exemplify using aligners that we have incorporated in our processing pipeline based on internal benchmarking for our most common experimental setup: mouse/drosophila transcriptome, Illumina HiSeq 2500, 76bp SE sequencing. The aligner of choice varies based on the type of reference available for the project: For genome based alignment of RNA-Seq data we use STAR, a MEM based aligner - it actually uses MMP (maximum mappable prefix, a variation of MEM).
2.1.1 Alignment to the genome
Here in this class, the STAR programm will be used for mapping. This programm is available by default which means no need to load any module.
2.1.1.1 Indexing the genome
NOTE: The command line below is shown for exemplary purposes, NOT to be executed :-)
First, the genome needs to be indexed. This is performed using the following command:
STAR --runMode genomeGenerate --genomeDir GENOME/Indices --genomeFastaFiles \
GENOME/FASTA/genome.fa --runThreadN 8 --sjdbOverhang 75 \
--sjdbGTFfile GENOME/GTF/genome.gtf
where the genomeDir parameter specifies the output directory for the index, genomeFastaFiles specifies the genome FASTA file path and sjdbGTFfile the file path of the gene annotation file, which can typically be retrieved from EnsEMBL (in gtf format) or UCSC (in gff3 format, to be converted in gtf format). We also provide an additional option that would need to be edited depending on your sequencing read length (sjdbOverhang 75); we selected 75 as our longuest reads are 76 bp long - see the STAR manual for the rationale behind this.
For indexing the genome we need the “genome” (fasta) and “gene annotation” (GTF) files from public repositories first. Let us check from the “2.2 Advanced options.” of STAR manuals.
We will use Ensembl FTP site
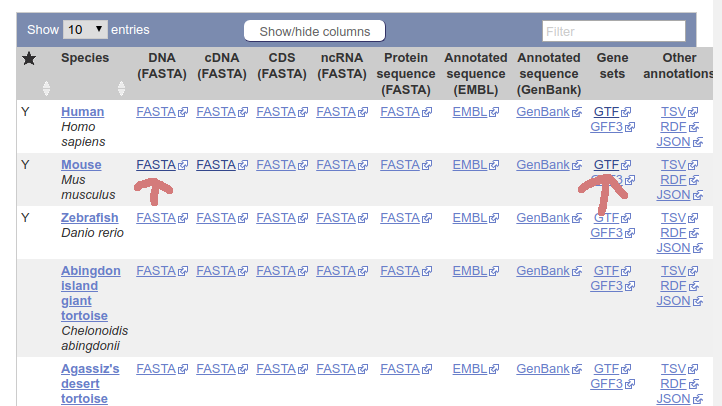
Now we will download the rference genome and annotation files.
# Create directory to store this reference files.
mkdir mouse_genome_release-96

## Copy the link of gtf file and download
wget -P mouse_genome_release-96/  ftp://ftp.ensembl.org/pub/release-96/gtf/mus_musculus/Mus_musculus.GRCm38.96.gtf.gz

# Unzip the file
gunzip mouse_genome_release-96/Mus_musculus.GRCm38.96.gtf.gz
ls mouse_genome_release-96/

### Now similarly download and unzip the reference genome using the above commands

## After downloading these files we need their absolute paths
find $PWD/mouse_genome_release-96/*
STAR takes lots of memory and disk space to index the genome. It may take long time also. Copy the following code to star_index.sh
#!/bin/bash -l
# author: dasroy
#SBATCH -J StarIndex
#SBATCH --constraint="snb|hsw"
#SBATCH -o StarIndex_out_%j.txt
#SBATCH -e StarIndex_err_%j.txt
#SBATCH -p hugemem
#SBATCH -n 1
#SBATCH --cpus-per-task=8
#SBATCH -t 12:00:00
#SBATCH --mem=32000 ## 32GB memory


genomeGtf="/wrk/student041/day7_rishi/RNAseq_exercise/mouse_genome_release-96/Mus_musculus.GRCm38.96.gtf"
if [ ! -f "$genomeGtf" ]
then
        echo "gtf not found"
fi

genomeFasta="/wrk/student041/day7_rishi/RNAseq_exercise/mouse_genome_release-96/Mus_musculus.GRCm38.dna.primary_assembly.fa"
if [ ! -f "$genomeFasta" ]
then
        echo "genome not found"
fi

mkdir GENOME_Indices

STAR --runMode genomeGenerate --genomeDir GENOME_Indices \
--genomeFastaFiles $genomeFasta \
--sjdbGTFfile $genomeGtf \
--runThreadN $SLURM_CPUS_PER_TASK --sjdbOverhang 65
Submit the job with following coomand
sbatch star_index.sh
2.1.2 Now align the reads
Once the genome index is built, we can align our sample reads to it. This is achieved as follows:
du -h GENOME_Indices

## Directory for alignment results
mkdir starAlign

## Not to Execute
STAR --genomeDir GENOME_Indices \
     --readFilesIn  input.fastq.gz --readFilesCommand zcat \
         --outFileNamePrefix starAlign/star_annotated_input.fastq.gz \
         --outSAMtype BAM SortedByCoordinate

## We need the absolute path of INdexed_Genome directory
find $PWD/GENOME_Indices
where there are a number of additional parameters: The parameter --outFileNamePrefix sets the path and prefix to where the results will be written. Our sample files are GZip compressed so we inform STAR how to read it (readFilesCommand zcat). The outSAMtype BAM SortedByCoordinate ensures that the final result is already converted to the “BAM” format and sorted by coordinate, saving a few additional steps doing this via samtools. As you can see, we provide many more arguments, which you can lookup in the STAR manual; STAR is highly configurable!
Copy the following code to star_align.sh
#!/bin/bash -l
# author: dasroy
#SBATCH -J Star_align
#SBATCH --constraint="snb|hsw"
#SBATCH -o StarAlign_out_%j.txt
#SBATCH -e StarAlign_err_%j.txt
#SBATCH -p hugemem
#SBATCH -n 1
#SBATCH --cpus-per-task=8
#SBATCH -t 12:00:00
#SBATCH --mem=32000

genome_indexed="/wrk/student041/day7_rishi/RNAseq_exercise/GENOME_Indices"

if [ ! -f "$genome_indexed" ]
then
        echo "genome indexed not found"
fi


STAR --genomeDir $genome_indexed \
        --readFilesIn trimmomatic/trimmed_non_rRna_Derm5Ctrl_run032119.fastq.gz  --readFilesCommand zcat \
        --outFileNamePrefix starAlign/star_annotated_trimmed_non_rRna_Derm5Ctrl_run032119.fastq \
        --outSAMtype BAM SortedByCoordinate --runThreadN $SLURM_CPUS_PER_TASK

### Now need to index the BAM files
module load biokit
samtools index starAlign/star_annotated_trimmed_non_rRna_Derm5Ctrl_run032119.fastqAligned.sortedByCoord.out.bam
Submit the job with following coomand
sbatch star_align.sh
2.1.3 Post-processing the alignment result files
STAR returns a number of result files:
a star_annotated_trimmed_non_rRna_Derm5Ctrl_run032119.fastqAligned.sortedByCoord.out.bam SAM file that contains the alignment in SAM format (Li et al, 2009).
a number of star_annotated_trimmed_non_rRna_Derm5Ctrl_run032119.fastqLog.* log files
a number of star_annotated_trimmed_non_rRna_Derm5Ctrl_run032119.fastqSJ.* files containing splice junction information.
Among the log files, Log.final.out and SJ.out.tab are of particular interest. The first details the alignment rate, percentage of uniquely/multiple aligning reads, rate of mismatches, INDELs identified in the reads, etc. The second file describes, in a tabular format, all the EEJs identified by STAR and whether these exist in the provided gff3 file or if they are novel.
2.1.4 Visualization
The BAM format is very efficient for computers to work with, but as a binary file format, it is unreadble to humans. However we can use tools like IGV to visualize the alignments. For that we also need to index the bam files, which is alraedy done in the previous slurm script.
Example command
samtools index input.bamNow copy the bam and bam.bai files using winscp to your local computer. And open in the IGV tool.
Copy the rest of the pre-aligned data.
cp /wrk/dasroy/DONOTREMOVE/GMB-203_rnaSeq/star_alignment/* starAlign/2.1.5 Quality check of alignment
Again we will use MultiQC to generate the alignment report.
module load biopython-env
multiqc -o qa/ -n starAlignment starAlign

# unload unnecessary module
module unload biopython-env
2.2 Step 5. Read count
This step varies depending on whether expression at the gene or the transcript level is required. In our case, we are interested in gene expression, as we would like to perform a differential gene expression study.
One major caveat estimating gene expression using aligned RNA-Seq reads is that a single read, which originated from a single mRNA molecule, can be aligned to several features ( transcripts or genes) if those alignments are of equivalent quality. This happens as a result of gene duplication and the presence of repetitive or common domains, for example. To avoid this, it is best practice to adopt a conservative approach by collapsing all existing transcripts of a single gene locus into a “synthetic” transcript containing every exon of that gene.
2.2.1 Counting reads per feature
The second step is to perform the intersection between the aligned position of reads (contained in the alignment BAM file) and the gene coordinates obtained in the previous step, to count the number of reads overlapping a gene. There are two primary caveats here: First the annotation collapsing process detailed above works on a gene-by-gene basis and hence is oblivious to the existence of genes that may overlap another gene encoded on the opposite strand. Second, aligners may return multiple mapping positions for a single read.
A de-facto standard for counting is the htseq-count tool supplied as part of the HTSeq python library (Anders, Pyl, and Huber 2014). This associated webpage illustrates in greater detail the issues discussed above. We have to provide “htseq-count” whether the data is from a strand-specific assay or not. Which depends on different library protocol and a good source of that is available from chipster.
2.2.1.1 Not to run
Example command for stranded data
htseq-count -f bam -m union -s reverse -t exon -i gene_id input.bam input.gtf > \
output.txt
We will store the output of htseq-count in readCount directory.
mkdir readCountCopy-paste the following commands to htseq_count.sh to submit another slurm job.
#!/bin/bash -l
# author: dasroy
#SBATCH -J htseq-counting
#SBATCH --constraint="snb|hsw"
#SBATCH -o htseq_out_%j.txt
#SBATCH -e htseq_err_%j.txt
#SBATCH -p serial
#SBATCH -n 1
#SBATCH --cpus-per-task=8
#SBATCH -t 01:00:00
#SBATCH --mem=4000

genomeGtf="/wrk/student041/day7_rishi/RNAseq_exercise/mouse_genome_release-96/Mus_musculus.GRCm38.96.gtf"


module load biokit

htseq-count -s reverse -t exon -i gene_id \
starAlign/star_annotated_trimmed_non_rRna_Derm5Ctrl_run032119.fastqAligned.sortedByCoord.out.bam $genomeGtf > \
readCount/htseq_star_annotated_trimmed_non_rRna_Derm5Ctrl_run032119.fastq.gz.txt
Submit the job with following coomand
sbatch htseq_count.sh
Copy the rest of the data and check quality
cp /wrk/dasroy/DONOTREMOVE/GMB-203_rnaSeq/star_count/* readCount/

# QC
module load biopython-env
multiqc -o qa/ -n htseqCount readCount

# unload unnecessary module
module unload biopython-env
2.3 Step 6. Final report
Till now we have used MultiQC to generate the report corresponding to each tool separately by scanning individual folders. Previous MultiQC commands were :
2.3.0.1 Not to run
1. multiqc -o qa/ -n rawReads qa/rawReads_fastqc

2. multiqc -o qa/ -n sortMeRna qa/sortMeRna

3. multiqc -o qa/ -n trimmomatic qa/trimmomatic_fastqc

4. multiqc -o qa/ -n starAlignment starAlign

5. multiqc -o qa/ -n htseqCount readCount
Let us try to combine them to a single report
## Delete the extra file in readCount directory
rm readCount/htseq_star_annotated_trimmed_non_rRna_Derm5Ctrl_run032119.fastq.gz.txt

module load biopython-env
multiqc -o qa/ -n finalReport ./ # scanning the whole project directory
There are solution to this in MultiQC manuals.
Due to mismatch in filenames in different output directories( like sortMeRna, starAlign and others), there are too many rows instead of six rows in ‘General Statistics’ section of qa/finalReport.html. MultiQC is higly configurable and filenames can be fixed by configuring ‘multiqc_config.yaml’. See the documentation. Pay attention to extra_fn_clean_exts and extra_fn_clean_trim:
Now we will try to configure ‘multiqc_config.yaml’
# Download the example config file
wget https://raw.githubusercontent.com/ewels/MultiQC/master/test/config_example.yaml

#rename it to
mv config_example.yaml multiqc_config.yaml

nano multiqc_config.yaml